Pitch-Shifters are not very common on pedal boards these days, possibly because there aren’t that many Pitch-Shifting pedals around. On the other hand, they are found in virtually every multi-effect units since the 90s, so chances are you have already come across one.
Apart from the obvious “Brian May harmonizing effect”, Pitch-Shifters are full of tricks and can be used to simulate a number of other effects, or even instruments, as I have attempted to show in the video below: octavers, octavias, 12 string guitar, chorus, etc.
Before we go into the settings used for the demo, let’s dive a bit into the history of Harmonizers and Pitch-Shifters.
Harmonies
As is often the case with effects, Pitch Shifters were invented to reproduce a very common musical practice: in this case, harmonising, very common in orchestras where one set of instruments plays a phrase while another set plays the same phrase but at a different pitch, say one fifth above for instance.
Guitarists have taken advantage of multi track recording techniques to record the same phrase at different pitches and thus obtaining that “harmonising” effect. Brian May, Queen’s guitarist in case you don’t know him (I suggest you pick up another instrument if that’s the case), is famous for his harmonised guitar parts, used on more Queen tracks that we can count. On live recordings, you can listen to his “Brighton Rock” solo piece where he uses long delays to “super impose” different guitar parts played at different pitches, brilliant stuff.
80s metal guitarists pushed harmonising to new levels. In Iron Maiden for instance, the two (now three) guitarists often play harmonised guitar parts, listen to “the seventh son of the seventh son” for a good example.
The Pitch Shifting Effect
The problem with harmonising is that you need at least two guitarists in live situations. Early analog “Pitch Effects” such as the Tycobrahe Octavia used by Hendrix were not really good enough to reproduce the sound of two or more instruments playing together, but they opened up new areas in tones. Analog Octavers like the Boss OC-2 allowed for an octave or two octaves down. Still limited but great for beefing up single note guitar lines.
A bit later, thanks to the advent of digital technologies, Pitch-Shifting effects which could actually “play” what you are playing at any pitch with good accuracy were invented. Eventide is probably one of the first brands to have solved the problem and Steve Vai made good use of their gear back in the 80s, on Passion and Warfare for instance (listen to Ballerina 12/24 for an extreme example).
And of course, let’s not forget the Digitech Whammy, now in its 5th incarnation. The red pedal took the guitar world by storm in the 90s as a pitch-shifting pedal geared towards “real time pitch effects”, thanks to its integrated expression pedal. I went to see Rage against the Machine in 1994 and the whammy was very prominent in Tom Morello’s rig, the sound was completely outlandish at the time.
Harmonizer or Pitch-Shifter
Although Harmonizer and Pitch-Shifter pretty much both means the same thing, there is a bit of an accepted rule that Harmonizers are more “intelligent”. What this means is that Harmonizers will Pitch-Shift by staying “within a scale” whereas Pitch-Shifters will always shift by the same amount of semitones. Let’s take an example. If you set an intelligent Harmonizer and a Pitch-Shifter to a third up, you will end up with the intervals shown on the following table:
| Original Input | C | C# | D | D# | E | F | F# | G | G# | A | A# | B |
| “Intelligent” Harmonizer One 3rd Up | E | E | F | F# | G | A | A | B | B | C | C# | D |
| “Dumb” Pitch-Shifter One 3rd Up | E | F | F# | G | G# | A | A# | B | C | C# | D | D# |
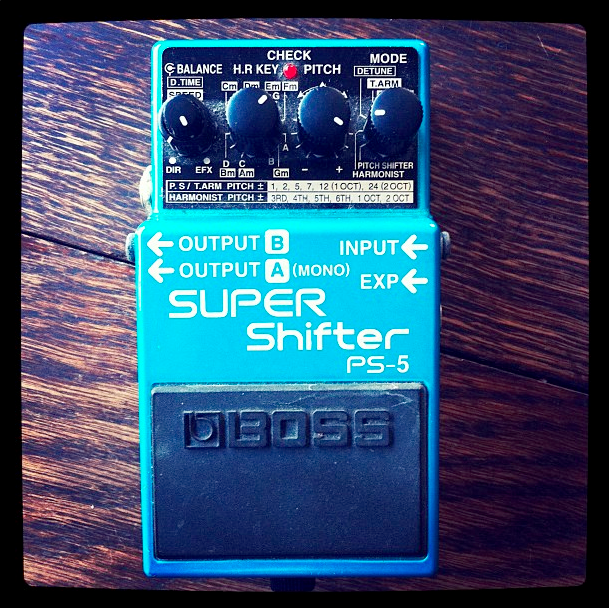
The “dumb” Pitch-Shifter will always play 4 semitones up while an Intelligent harmonizer will modulate to stay within the scale, here C Major. Playing a D for instance, will trigger the “intelligent” Harmonizer to ‘ play’ an F over your D which is a minor 3rd (3 semitones), which stays within the C scale. Obviously, “intelligent” Harmonizers work on single note lines, not on chords but that is quite true of any Pitch-Shifter effect. The Boss PS-5 pedal that I demonstrate in the video below can act as a Pitch-Shifter or an intelligent Harmonizer depending on which mode is selected.
Tips and Tricks
The following video shows how to use a Pitch-Shifter/Harmonizer in a traditional way but also how to use it to “emulate” other effects, or even instruments. For this, I have used my trusty Boss PS-5 (now replaced by the PS-6 in the Boss line), one of the only full blown Harmonizers in compact pedal form.
- Chorus: the detune mode of the PS-5 allows for a nice chorus emulation. Actually, a lot of big guitarists have been using a slightly detuned pitch-shifter as a chorus. Mike Stern comes to mind but also Eddie Van Halen in the 90s thanks to his Eventide H3000.
- Octavia Emulation: pitch-shifter mode, one octave up (12 semitones) and mix quite high (past 12 o’clock) to have a lot of Pitch-Shifted signal. Sounds better with a distortion or fuzz before the pitch-shifter.
- 12 String Emulation: almost the same setting as before but the mix is back down to around 10 o’clock to allow less pitch-shifted signal. It sounds better with a clean tone
- Octaver emulation: Pitch-Shifter set one octave (12 semitones) down, mix around 12 o’clock. Sounds good with either a clean or distorted signal. Note that if you set the mix on maximum (only pitch-shifted signal), you can almost emulate a bass. The tracking can make it hard to use on fast licks
- 2 Octave Octaver: same setting as before but with the pitch-shifter set 24 semitones down.
Conclusion
Pitch-Shifters are a lot of fun and can actually be used to generate a variety of tones and effects, not jus the classical “Brian May” effect. As always, experimentation is the key, there are hours of fun to be had.
Small Selection of Pitch-Shifting/Harmonizing Pedals
As I mentioned earlier, there isn’t a huge array of Pitch-Shifting pedals to choose from, the most notables are:
- Boss PS-6 Harmonist: the latest in the PS series, does pitch-shifting, intelligent harmonising, detune and more in the classic compact boss form factor
- Boss OC-3 Super Octave: will only do one and/or two octaves down, perfect to fatten any line.
- Eventide Pitch Factor: not cheap but this is the real deal from the inventors of Harmonisers
- Digitech Whammy: although not a “regular” pitch-shifter, the whammy is a classic
- Electro-Harmonix has a full range of pitch-shifting products from the small Micro-POG to the insane HOG2. Although they rather fall in the octaver or synth categories, they are nonetheless interesting. The super fat tone in the intro to “Super Colossal” by Joe Satriani was made with the original POG.
- Most multi-effect units will carry a Pitch-Shifter and some of them are small enough to fit on a pedal board.
This post originally appeared on www.guitartoneoverload.com.