Category Archives: Tone tips

How Pickup Height Affects the Tone (Updated Feb 2012)

Is the bridge pickup of your Telecaster too bright? Or do the two Humbuckers in your Gibson seem to have very different output volumes? These two common situations prompt a lot of G.A.S. stricken guitarists to purchase new pickups or modify their electronics.

But did you know that the distance between a pickup and the strings, also known as pickup height, can be setup easily on most guitars and can alleviate a lot of these problems?

As a general rule, when you move a pickup closer to the strings, you will get more output but also more high frequencies which can become ear piercing. At some extreme settings you might loose some sustain as the magnet(s) contained in your pickup(s) will “slow down” the vibrations of the string.

On the other hand, when you move a pickup further away from the strings, you will loose some of those ear piercing frequencies but get a lower output volume.

Sound Example

Here is an example featuring the bridge pickup of my 1978 Telecaster:
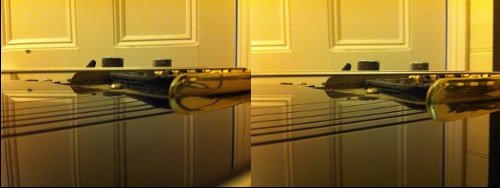
Bridge Pickup of a Telecaster - Left: High Pickup Height, Right: Lower Pickup Height

I have kept the exact same amp settings and have recorded similar clean licks with my Telecaster bridge pickup set very high:

Audio MP3

and then lower:

Audio MP3

Notice the difference in output volume and high end frequencies.

How to Change the Pickup Height on your Guitar

I will detail here how to change the height of the pickups on Telecasters, Stratocasters and Gibson style guitars. Note that it might be different for other brands, models or eras! Usually, manufacturers will issue precise guidelines as to what the optimal pickup height should be for a particular model. Personally, I prefer to do it by ear as I need to hear the changes through my effect/amp setup.

A last word of advice: in general, when you start turning screws to set up anything on a guitar (truss rod, tremolo system, pickup height, etc.), start by quarter turns, not full turns. Be gentle! In the case of pickup height, a quarter turn might be enough to reach the sweet spot you are looking for. To give you an example, with the bridge pickup of my Telecaster, I almost cover the full spectrum in about two full turns.

Adjusting Pickup Height on a Telecaster

On my 1978 Telecaster, I cannot find any visible screws to adjust the neck pickup height but the bridge pickup offers no less than three screws (see image below). No wonder as this pickup can be too bright and often needs a bit of adjustment. By loosening (anti clock wise) the screws, the pickup goes down while tightening them (clock wise) brings it closer to the strings. By playing with these three screws, you can have the pickup higher for the lower strings but lower for the higher strings. You can also have it at an angle. Remember the general rule, the closer to the strings the more volume and high end. Mine had to be lowered a bit as I found it a tad too bright for clean work and a bit too rich in “ear piercing” harmonics. Update Feb 2012: refer to the  Telecaster setup guide for official guidelines.
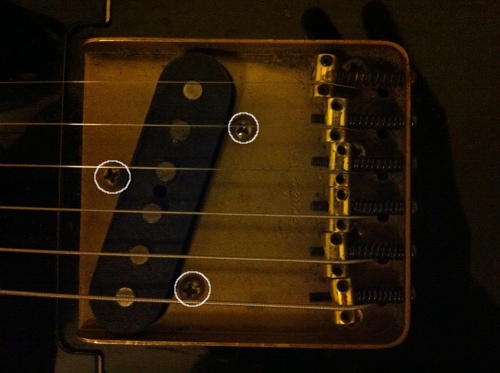
Fender Telecaster - Position of the Pickup Height Adjustment Screws


Adjusting Pickup Height on a Stratocaster

My 1997 Fender American Classics Custom Shop Stratocaster is fitted with Kinman noiseless pickups. Chris Kinman has a great pickup height adjustment guide on his website, make sure to check it out.

Anyway, these pickups produce very different results depending on their height so getting it right for your taste and gear is paramount. Luckily, it is really easy on a Strat as each pickup has two screws (see image below). Loosen them to lower the pickup or tighten them to bring it closer to the strings. Update Feb 2012: refer to the Stratocaster setup guide for official guidelines.
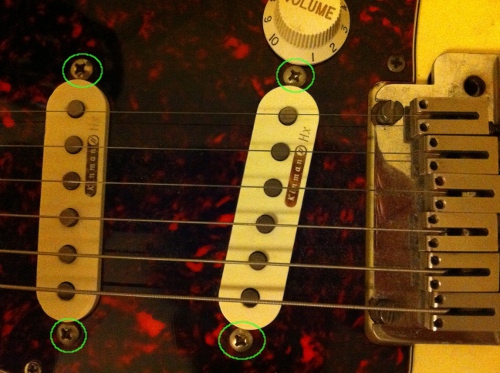
Fender Stratocaster - Position of the Pickup Height Adjustment Screws
Adjusting Pickup Height on a Gibson Style Guitar (here, a 61 Reissue SG)

Gibson guitars are much like Strats with two screws per pickup (see image below): loosening the screws lowers the pickup while tightening them brings it closer to the strings. Update Feb 2012: refer to this Gibson.com post for official guidelines.
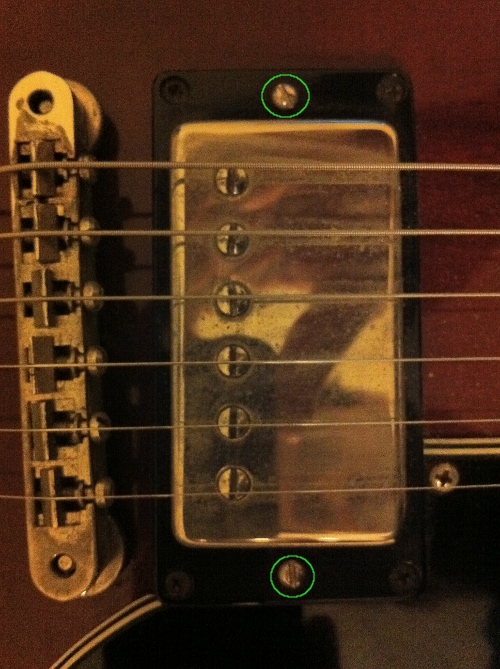
Gibson SG - Position of the Pickup Height Adjustment Screws


Use of Reverb for Guitarists, Part 2: Reverb used as an Effect

As I have shown in the audio examples at the end of Part 1, a reverb unit can be used as an effect instead of a sound reinforcement tool. The main difference is that when you use the reverb as an effect, you usually want it to be heard as opposed to using it in a subtle fashion to add some depth to the sound. It is something that guitarists on the lookout for bigger tones have pioneered, thanks in large part to Fender whose amps often offered a built-in spring reverb. And let’s not forget their stand alone tube reverb unit which is an absolute classic.

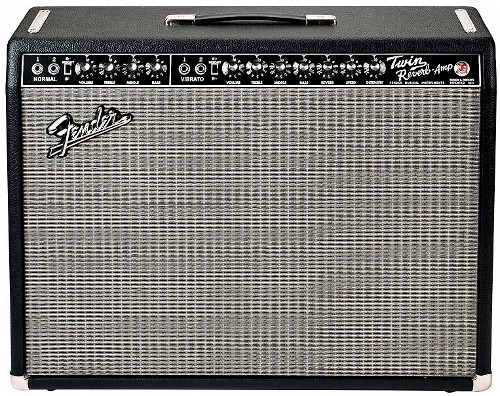
The Fender Twin Reverb, a classic example of amplifier with builtin reverb

Surf music wouldn’t have been quite the same without these Fender clean guitar tones laden with spring reverb. But listen to Stevie Ray Vaughan’s albums and you will hear quite some spring reverb as well. It shows that electric blues is another style where amp reverb is a common staple. Past spring reverbs, a classic example of studio reverb used partly as a sound reinforcement tool and partly as an effect is Voodoo Chile Slight Return by Jimi Hendrix. The wah wah intro is completely magnified by an EMT plate reverb.

The downside of reverb used as a live guitar effect is that it can be difficult to control in a venue, even a small one, because the venue itself will already have some natural reverb (see my previous post). It might make your tone really muddy which might be why, come the eighties and the advent of cheap digital delay pedals, most guitarists switched to using delays to widen their tone. It is not quite the same thing though and I can sense reverb pedals becoming popular.

Adding a Reverb to your Board

If reverbs have always been present in multi effect units, Boss was until about 10 years ago the only brand that offered a compact reverb pedal. Nowadays, there is a wide array of models on offer. Here is a short selection of reverb pedals :

  • Boss RV-5: Boss was the first company to manage to squeeze a digital reverb in a compact pedal. I personally own an RV-3 which can generate Reverb AND delay effects (I will make a demo soon). The RV-3 has been replaced by the RV-5 which has dropped the delays but has gained a spring reverb simulation among other things.
  • Electro Harmonix: the Holy Grail and its siblings have become immensely popular. They sport a luscious digital reverb as well as a spring reverb simulation.
  • The T-REX Room-mate is digital I suppose but it features a tube for added warmth.
  • The TC Electronic Tone Print “Hall of Fame” is the new kid on the block, here is a demo which shows you what you can do with a good reverb pedal (TC also offers the Nova Reverb) :

And finally, here is a demo of the Sole Mate and Reverbamate pedals from Vanamps. They are the only non digital/actual spring reverb pedals that I know of, for those of you who demand the real deal:

Reverb for Guitarists, Part 1: a Sound Reinforcement Tool

I recently got a few comments asking why I use reverberation in post processing in some of my Youtube videos. In this series of posts, I would like to outline the two main uses of reverb for guitarists. In this first part, I will focus on the use of reverb in the studio and will explain why I sometimes add some light reverb to my videos. You will also find several sound examples. Part two will focus on the use of reverb as an effect.

Natural vs Artificial Reverb

In an enclosed space, any sound will bounce off the walls, thus creating a king of muffled echo. An extreme case of reverberation is found in cathedrals or caves where any sound can be reverberating for seconds. But even in a small space, you will get some reverberation. Try clapping in your toilet or bathroom and you will probably hear it. In a nutshell, a reverberation unit (commonly known as reverb) is an effect device which aims at reproducing this phenomenon. Reverberation is also sometimes referred to as “ambiance”.

Reverberation is almost as old as recording studios or radio stations. Sound producers and engineers had found out very quickly that recording any source (guitar, voice, etc.) using a microphone placed close to it lacked any sort of “ambiance” or “natural reverberation”, producing a quite unpleasant dry sound.

To solve that problem, a number of artificial ways to produce reverb were invented. The most primitive was to use a big empty room with a speaker at one end and a microphone at the other end to record the effect. Later on, spring and plate reverberation units were invented. Eventually, digital technologies became affordable and reverb units capable of simulating pretty much any space are now available as software plugins, pedals, rack effects, etc. I invite you to read the wikipedia page dedicated to reverberation for more information.

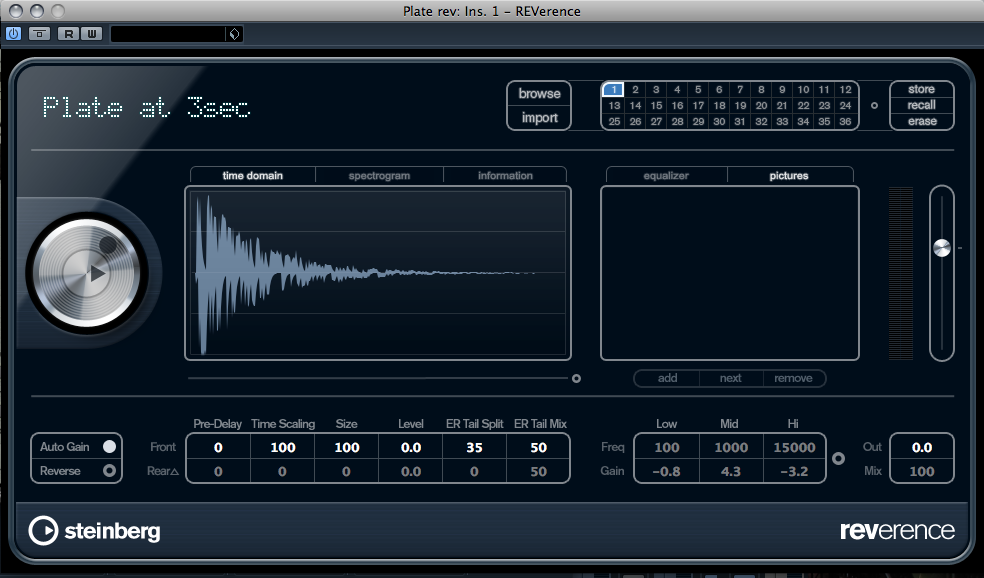
Reverence is a Cubase 5 reverb plugin which uses convolution techniques i.e it uses imprints from actual venues to generate reverberation

When I use a bit of reverb in my videos, this is not to “inflate” the tone, it is just because the microphone I use is close to my amp and misses out on the natural reverb of the room.  Short of adding some artificial reverb, you can change the microphone placement and put it further away from the amp in order to get more of the ambiance of the room, but you might pick up undesirable sounds. It is a matter of experimenting and finding the right spot.

Guitar and Studio Reverb Sound Examples

Here is a short distorted guitar clip. It was recorded by placing a microphone really close to my Fender Champ and no reverb was added. Note how dry it is:

Audio MP3

Here is now the same clip with a short room reverb (I have used the LA Studio preset of Cubase 5’s Reverence plugin):

Audio MP3

The difference is very subtle but the reverb adds a “roundness” to the tone and makes it a little fuller without being over the top. This is the kind of reverb I often put on my youtube videos. When using reverb for sound reinforcement purposes, it is important to be subtle, the idea is not to hear the effect itself.

And here is now the same clip with a lot of Plate Reverb (using the Plate Reverb 3s preset of Cubase 5’s Reverence plugin):

Audio MP3

Note how wide the tone becomes but also how different it is from the original. You can really hear the reverb, one could argue that in this case, the reverb is too pronounced and is rather used as an effect.

And now listen to the same solo alongside other instruments. For this first clip, there is no reverb at all:

Audio MP3

By adding a dose of plate reverb to every instrument, you get a better sense of depth and a bigger overall sound:

Audio MP3

Some of you might prefer a drier sound but more often than not, the point is that reverberation is a timeless and indispensable studio tool.

We will explore in Part 2 of this series of posts the use of Reverb as an effect. This next post will feature a list of reverb units to add to your pedalboards, stay tuned!

Using a graphic equalizer to get “scooped mids”

I was working the other day on one of my videos and played a bit with the GEQ-10 graphic equalizer plugin in Cubase 5. Scooping the midrange is a well known trick to get a more “metal” tone. Rumour has it that James Hetfiled of Metallica spent years getting the perfect scooped tone.

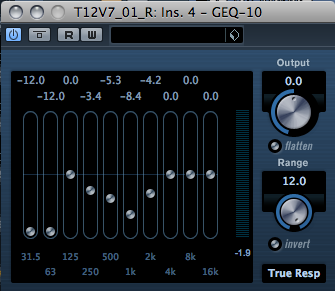
I used this setting to remove the midrange as well as the useless frequencies for a guitar (below 82Hz):

So basically, the midrange frequencies at 250Hz, 500Hz, 1kHz and 2kHz were reduced by various amounts.

Here is the result without the equalizer:

Audio MP3

Here is the result with the equalizer:

Audio MP3

Pretty cool although keep in mind that the body of your tone is in the medium and an heavily scopped tone might just drown in the mix, you have to experiment!

It is something you can probably do with an equalizer pedal as well as using your favorite software. To accentuate the effect, you can bring up the lows and highs while reducing the mids.

For these clips, I have used my Custom Made guitar by Robin Bully going into an Analogman modded TS9 then into an Analogman modded Boss DS1 then into a Boss DD-3 delay and finally into my trusty 5W all tube Fender Champ miked by a Rode NT4.

The settings on the amp and the pedals were:

  • DS-1 level 11 o’clock, dist 4 o’clock, tone 8 o’clock
  • TS9: level 12/1 o’clock,   drive 2 o’clock, tone 8 o’clock
  • Amp: Volume at 2.5, Bass at 10, Treble at 2.5
Related Posts with Thumbnails