Category Archives: Video Demos

All my video demos here

How to use a Delay, Part 2

In Part 1 of this series of posts dedicated to the use of delay, I have shown how to create rhythmical effects “à la U2” by synchronizing the delay to the tempo of a song.  Today, in Part 2, I will first give you a few example settings showing how to fatten your tone using a Boss DD-3 and an Electro Harmonix Deluxe Memory Man. After the videos, I will explain the differences between analog and digital delays as they both have distinct sounds and when it comes to choosing a delay pedal, the analog versus digital debate is still very much alive!

Fattening your tone: the “guitar hero” delay effect

Here is a personal favorite of mine, the type of delay that countless 80s guitarists used pretty much all the time to season their fierce solos. I have reproduced it using a Digital Boss DD-3 as well as an Analog, darker sounding Electro Harmonix Deluxe Memory Man:

Gear used: American Classics Stratocaster with Kinman pickups -> Analogman TS9 -> Proco RAT 2 -> Marshall JMP-1 preamp plugged direct into the recorder

To recreate this type of delay using a software plugin or multi-effect, set a delay time around 350 ms, 3 or 4 repetitions and a mix level of about 25%. Results may vary depending on your exact equipment. As always, experiment to find out what you are most confident with and most importantly what the song you are working on exactly needs.

Fattening your tone: the slapback echo

I have written a complete post about it so I will only give the audio examples here. The slapback echo is the “mother of all delays”. It consists of only one short repetition. As simple at it may seem, it is a very effective tool as shown in this video:

Gear used: 78 Telecaster -> Proco RAT 2 -> Fender Champ

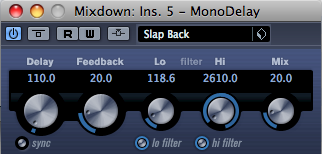
In the video, the slapback delay is generated using Cubase 5’s delay plugin with the following settings:

Slapback Settings

You can achieve the same type of tone with a Boss DD-3 and the following settings: Mode 200ms, E.LEVEL at 12 o’clock, F.BACK at 9 o’clock and D.TIME at 4 o’clock. You might want to vary the E.LEVEL or D.TIME to taste. It is easy to reproduce this effect with any other model of delay, just set the “delay time” between 70 and 200ms and the “feedback” quite low in order to have just one repeat.

Fattening your tone: Multitap delays

When one delay is not enough, use several of them! Known as “Multitap Delay”, the use of two or more delay units multiply the possibilities. Here I show the Boss DD-3 and the Electro Harmonix Memory Man together. Note that I had to reduce the delay time on the DD-3 compared to the first video, reason being that the previous settings were too close to the Memory Man and did not create enough of a swirl:

Gear used: American Classics Stratocaster with Kinman pickups -> Analogman TS9 -> Proco RAT 2 -> Marshall JMP-1 preamp plugged direct into the recorder

Again experimenting is the key here. I have used two delay settings that were quite similar but you can also use two delays with very different settings like a short one and a long one. At some stage, Joe Satriani was using three delays at once: one with a short delay time, another one with a medium delay time and a third one with a long delay time. It gave his tone almost a reverb like feeling.

The Analog vs Digital Debate

After seeing these demos you might want to go shopping for a delay pedal and must be wondering: “analog or digital?”. We have to go back in time in order to understand why there are several types of delays on the market.

Continue reading How to use a Delay, Part 2

Guitarists: The Tone of John Butler

It is time for some electric/acoustic action with John Butler. I will attempt to approach his tone using some common and relatively inexpensive pedals.

Australian guitarist John Butler was revealed to the mainstream in 2004 when his third album, “Sunrise Over Sea”, was released. This album included a huge hit single: “Zebra“. John Butler always plays in a trio configuration, hence the name of his band “The John Butler Trio”.

John Butler in Auxerre, France, 2007 - Photo by Benoît Derrier
Guitars and Guitar Style

His guitar style and and use of gear are quite original, although not entirely unique. His main instrument is a 12 string acoustic guitar made in Australia by Maton. I should actually say 11 strings since the higher ‘G’ is removed as, according to John Butler, it makes the guitar sound too trebly. This guitar is used “normally” as well as plugged into effect pedals and a Marshall amp to give it a more “electric” vibe.

From a style point of view, John Butler’s mastery of finger picking and slide as well as guitar percussion make him an interesting guitarist to study, quite fresh compared to the heavy rock super fast arpeggios type. Don’t get me wrong, I like super fast heavy metal players but it is sometimes nice to study a different style, which happens to be quite technical too!

John Butler also plays a Dobro, a banjo, a Telecaster or a 6 string acoustic guitar but I will concentrate in this post on his 12 string tone. In this interview, John Butler explains in details what guitar he uses and his signal path, which is fairly complex but I will try to summarise it here.

Signal Path

John Butler’s 12 string Maton is fitted with two pickup systems, one for the “electric” tone and one for the “acoustic” tone.

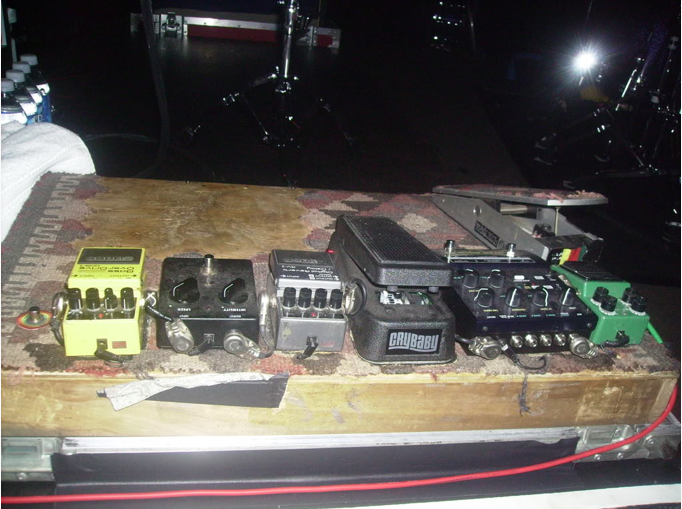
For the electric tone, the magnetic part of a Seymour Duncan Mag-Mic soundhole pickup  is used. This is what goes into the pedal chain. This pedal chain is composed of a Boss ODB-3 Bass Overdrive, a Voodoo Lab Micro Vibe, a Boss RV-2 Digital Reverb, a Dunlop CryBaby 535Q wah and finally an Akai Head Rush E2 delay. The pedal chain then goes into an Avalon U5 instrument DI/preamp. The signal from the Avalon U5 then goes into a volume pedal and an Ibanez TS9DX overdrive before going into a 1975 Marshall JMP Super Lead amp. phew… The volume pedal allows to blend in more or less electric tone, very clever…

Here is a photo of the pedal chain (source here):

John Butler's Pedal Chain

For his acoustic tone, John Butler relies on the integrated APMic pickup system devised by Maton for their guitars. The signal from this pickup system goes into an Avalon M5 Microphone Preamp. Both Avalons preamps (the U5 mentioned earlier and the M5) go into a mixer and then into a switcher box and then into the main mixing desk. This is the “acoustic” tone. But from my understanding, since the output of the two avalon preamps are mixed together, some of the pedal effects are part of this acoustic tone, not so purely acoustic then…

John Butler uses the same system live or in the studio. In the latter case, his guitar is also recorded by microphones which gives him another signal to play with. This whole system is very flexible as it can provide a pure acoustic tone, an acoustic tone with effects or a more electric tone. The amount of electric tone can be controlled via a volume pedal.

Let’s Try to Approach John Butler’s Tone

The idea in this series of posts is to try to capture the spirit of one’s tone with a minimum of gear. I hope to inspire you into using an acoustic guitar in an “unconventional” way, that is augmented by an electric guitar amp and effects. I have not tried to reproduce the acoustic/electric duality of John Butler’s setup and have focused on the electrification of an acoustic guitar. It is something than few guitarists do but which can open a world of possibilities.

I am lucky enough to own an Australian made Maton guitar, an EM225C to be precise. It is equipped with the AP4 pickup system, also designed by Maton. It is a fantastic instrument but has “only” 6 strings. So the first pedal I decided to use was a BOSS CH-1 chorus in order to simulate a 12 string tone. I then decided to use a BOSS RV-3 reverb, close enough to the RV-2 John Butler uses. Both the RV-2 and RV-3 are discontinued so you will either have to get the newer RV-5 or look on the second hand market. I also decided to use a BOSS SD-1 overdrive which is a cheap but good enough overdrive. Of course, you could be using an Ibanez Tube Screamer or any other good overdrive, including your amp’s. Finally, I opted for a Morley wah because we all love some wah action.

The final chain went:

Maton EM225C Guitar -> Morley Wah -> BOSS SD-1 Overdrive -> BOSS CH-1 Chorus -> BOSS RV-3 Reverb -> Fender Champ amplifier set clean.

I show at the beginning of the video how a chorus effect can emulate the tone of a 12 string guitar and then I show the whole chain:

The settings were:

  • Amp: 1974 Fender Champ with VOLUME at 3, BASS at 10 and Treble at 2.
  • BOSS SD-1 Overdrive: Tone 9 o’clock, Level 12 o’clock, Drive 3 o’clock
  • BOSS CH-1 Chorus: E.LEVEL 3 o’clock, EQ 2 o’clock, RATE 12 o’clock, DEPTH 2 o’clock
  • BOSS RV-3 Reverb: BALANCE 9 o’clock, TONE 9 o’clock, R.TIME 1 o’clock, MODE 9

The amp was miked with a RODE NT-4 and recorded with a BOSS Micro-BR. The recording was then transferred into Cubase 5 to add some compression (mainly to optimise the volume).

Tube Screamer Alternative: The BOSS SD-1

A good overdrive pedal is a must have for nearly every guitarist. You can use it against a clean amp to obtain blues and classic rock tones, or you can use it to push an already overdriven amp or distortion pedal to reach for higher gain tones.

After introducing the Xotic BB Preamp as a possible alternative to the ubiquitous Ibanez Tube Screamer, I will now leave the expansive boutique route and go for a cheaper model: the BOSS SD-1. As with my previous post, I have made a video to illustrate my point (see the end of this post).

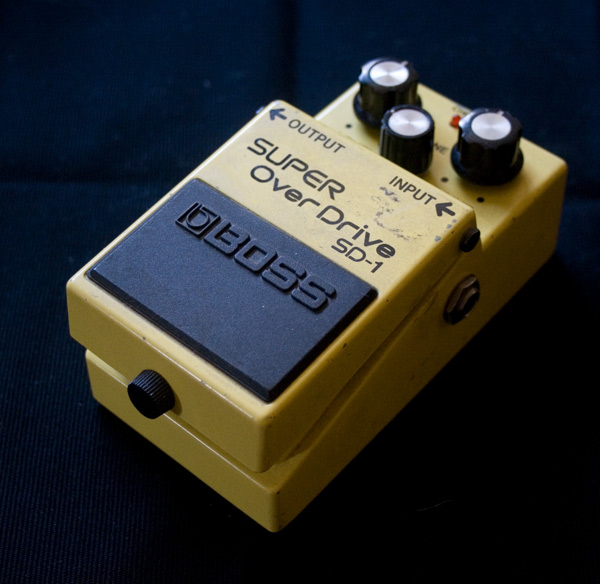
The BOSS SD-1 - Photo by Pia Jane Bijkerk

I know that it is trendy to bash BOSS pedals and that some guitarists only use expansive boutique pedals nowadays but I find this is a bit of an extreme position. There are very good models in the BOSS line and the SD-1, which has been in production for 29 years (!), is surely one of them.

The SD-1 is quite close in conception to a Tube Screamer and not so far tone-wise. It also sports the same three knobs: Drive (amount of overdrive), Level (output Volume) and Tone (Equalization). But I find it to have a bit more grit, it has a more “rock” tone whereas Tube Screamers lean more on the “blues” side (I am over simplifying here).  Also, The BOSS SD-1 is a favorite among metal players to be used as a booster, not a main distortion. You won’t get a better and cheaper option to push an already overdriven Marshall amp over the edge.

This is exactly how Zakk Wylde used it for years before getting his own signature overdrive model with MXR. Even the almighty Eddie Van Halen had a BOSS SD-1 in his pedal board in the 90s, presumably used as a boost to give his Peavey amps a kick. In that respect, the level control is very useful on both the Tube Screamer or the SD-1. By cranking it while keeping the gain quite low, you can push any tube amp into natural overdrive.

And did I mention the BOSS SD-1 was cheap? I think I did but check out your favorite shop, you’ll know what I mean. Here in Europe, they go for for about 50€. And 29 years of production means there is plenty of them on the second hand market.

Is this the perfect overdrive? Of course not, otherwise there would be no other on the market. The SD-1 is quite noisy compared to boutique alternatives. The noise level is actually often in favor of boutique pedals when compared to mass produced models. Also, it suffers from the same “bass sucking” problem as Tube Screamers do when used against a clean amp (not so much when used against an already overdriven amp). In band situations, it is usually not a big problem as the bass frequencies are already occupied by other instruments though I can understand why some guitarists have a problem with it. Finally, when I mentioned earlier that it has more grit than a Tube Screamer, it can be a plus or not, depending on your style and preferences.

Video Demos

In this first video, I am comparing my Analogman modded TS9 Tube Screamer with the SD-1 using a Fender Stratocaster. I use various amount of gain and show at the end how it can be used to boost an amp, and a distortion pedal (a Proco RAT 2):

Gear used for the video: American Classics Stratocaster fitted with Kinman AVn blues pickups and 1974 Fender Champ. The amp was miked with a RODE NT-4. The recording was transferred into Cubase 5 to optimize the volume (compression) and add a hint of reverb.

In this second video, I show how The SD1 and the TS9 sound with a Gibson SG 61 reissue equipped with Humbuckers:

Gear used for the video: Gibson SG 61 Reissue with stock pickups and 1974 Fender Champ. The amp was miked with a RODE NT-4. The recording was transferred into Cubase 5 to optimize the volume (compression) and add a hint of reverb.

Using two overdrive pedals simultaneously

Combining two overdrive pedals is a topic that pops up often in guitar forums. I suppose the fact that Stevie Ray Vaughan used that kind of configuration at some stage in his career has a lot to do with it. I did quite some experimentation over the years in that “field”, and I thought I should share with you what I have learned.

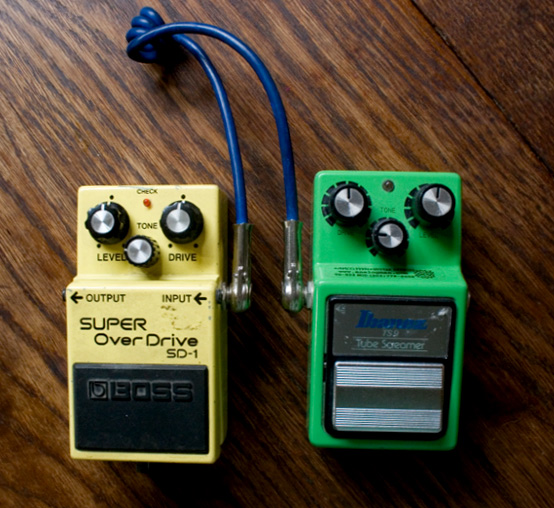
Boss SD-1 and Analogman modded TS9

I will write here about combining two overdrive pedals and I will leave distortion and fuzz pedals for future posts. As I show in a video below, you can get interesting tones out of two overdrive pedals. Why not use just one pedal but with more gain, you might ask? Well, the answer is that two overdrive pedals don’t sound like one pedal with more gain. In addition, it gives you more tonal options since you can switch one of the two pedals on, or the two together. That makes four different tones in total if you count the clean tone.

But you have to know that some combinations work and some don’t. It is hard to predict how two overdrive pedals will interact. By not working, I mean that it might sound overly squashed or very fizzy. Getting the right settings is also very important. I find that when you use two overdrive pedals together, it is rarely a good idea to have one (or the two) with the gain maxed out. Try with lower values first.

I have recorded a video showing how my Analogman modded Ibanez TS9 plays with a stock Boss SD-1. Both pedals have the drive and level at 12 o’clock. The tone is at 9 o’clock since my Fender Champ amplifier is quite bright. The SD-1 is placed after the TS9.

The resulting tone is quite tight and focused with a good sustain. “Focused” is the important word here, this is where two overdrive pedals put together differ from one higher gain pedal.

Here is a video where I show my clean tone first, then I switch the TS9 on, and then both pedals:

The amplifier was miked with a Rode NT-4 and recorded using a Boss Micro-BR. The recording was then transferred into Cubase 5 to optimize the volume and add a hint of reverb. The guitar used is a Fender American Classics Custom Shop Stratocaster fitted with Kinman AVn blues pickups.

Related Posts with Thumbnails